We needed a headboard for our king size bed but we didn't want just any headboard. After looking at various headboards on the internet I saw one made from wooden pallets. I totally fell in love with it and according to the author, it was built by someone who didn't have any experience with a hammer let alone power tools. After googling more pallet headboards I decided to make one...going one step further I added vintage paddles which I have been collecting over the years.
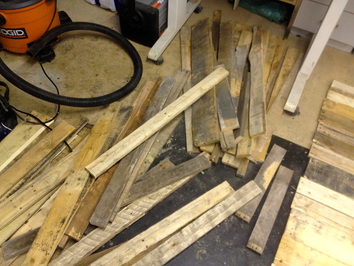
Pallets should be easy to come by but with the winter we have had I'm sure that any free pallets are being scooped up for firewood. I visited the local Home Depot store and asked if they had anything I could take off of their hands and was lucky to pick up 4 pallets and which were in very rough condition. A few days later my boyfriend was able to pick up 2 more at another store that were in much better shape. Not to be discouraged at the condition the ones from Home Depot, I started taking them apart. To take the pallets apart I used a skillsaw, a sawsall with a metal blade to cut nails, a hammer, pry bar and alot of umph!. I recommend getting more pallets than you think you might need as the wood can split apart easily especially when your prying apart the 2x4 from the middle of the pallet. After a lot of grunting I had a pile like this
Pallets should be easy to come by but with the winter we have had I'm sure that any free pallets are being scooped up for firewood. I visited the local Home Depot store and asked if they had anything I could take off of their hands and was lucky to pick up 4 pallets and which were in very rough condition. A few days later my boyfriend was able to pick up 2 more at another store that were in much better shape. Not to be discouraged at the condition the ones from Home Depot, I started taking them apart. To take the pallets apart I used a skillsaw, a sawsall with a metal blade to cut nails, a hammer, pry bar and alot of umph!. I recommend getting more pallets than you think you might need as the wood can split apart easily especially when your prying apart the 2x4 from the middle of the pallet. After a lot of grunting I had a pile like this
Next was the layout. Originally I placed the boards horizontal but found that I needed to piece-in random sizes of wood and although it looked nice it was way more work than I wanted to do. The boards I had were 40" long and so I layed them out vertically on a flat service in my work shop. (Size of the kingsize headboard is 40" tall by 80" wide and including the legs it was 62" tall). Once I had a mockup of the size I purchased 2 - 2x4's and 2 - 2x2's from the lumberyard and laid out a frame making it at least 2" smaller on the sides (2x4's), and also making sure that since I was going the mount the headboard onto the metal bed frame that the 2x4 would be centred over the bedframe holes. I glued/screwed the panel pieces on through the back so as to not have any screws showing. To help stabilize the boards I glued and screwed on 2 scrap pieces of board onto the back of the panels. Once that was finished I framed the outside using pallet wood by gluing the boards on and using finishing nails to nail the frame on. Using an oribital sander I sanded the panels and frame. Parts of this wood was quite rough but a good sanding helped keep the splinters at bay. I decided to stain the headboard with leftover stain I had (Puritan Pine). Next I purchased milk paint online through Lee Valley Tools. A confession, I am a Milk Paint Virgin and had no idea what this piece would look like. Milk Paint naturally peels to give it an aged look. Apparently on rough wood it will just soak in (even after I had stained it) so peeling never happened with the first coat of bayberry green milk paint. Once that coat was dry I randomly spread vaseline onto the wood and painted it with buttermilk colour milk paint. The paint did not stick where the vaseline was therefore it gave it a "chipped" look. Once that paint had dried I used a 100 grit sand paper and hand sanded the headboard lightly all over and then concentrated on the places where the green paint was showing through to give it a more aged look. After I used Min Wax with a soft cloth and waxed the painted surface and the vintage paddles.
Here is the finished headboard. Cost was minimal with the most money spent on milk paint which I had to order online. Now I am looking forward to building a queen size version for my son's room.
I hope you enjoyed reading my blog. Please leave your comments. I would love to hear what you think :)
I hope you enjoyed reading my blog. Please leave your comments. I would love to hear what you think :)

 RSS Feed
